Users Manual V1.0 - Mar. 1999
Douglas Duncan
Univ. of Chicago
![]() WARNING - UNDER CONSTRUCTION!
WARNING - UNDER CONSTRUCTION! ![]()
Users Manual V1.0 - Mar. 1999
Douglas Duncan
Univ. of Chicago
![]() WARNING - UNDER CONSTRUCTION!
WARNING - UNDER CONSTRUCTION! ![]()
Especially during March 9-12, 1999 these pages will change rapidly. If you have questions or helpful suggestions you are welcome to email me: duncan@oddjob.uchicago.edu.
This Manual has three main sections:
Description of the Instrument (including sample spectra)
OverviewDetails of the optical design (will be linked to the WWW pages of designer Shu-i Wang)
Jump immediately to observations of:
The "Observing" section is in two parts. The first describes the various windows you see on the screen and what they control. The second gives some sample observing sequences. Although there are half a dozen windows which present various information about the telescope and instrument, they are clear and straightforward, and you can expect to become an efficient observer within a few hours. The few things I have found not intuitive or easy to get wrong are shown in red, to warn you.
Part I - Windows and what they control.
You or the telescope operator also need to specify where the data you take will be stored. (Locally, at APO. You can move it later.) The default is a directory /export/images. If you are observing more than one night, most people find it convenient to put each night's data in its own subdirectory, e.g. feb2, feb3, etc. To do this, you will have to login to the MC in a telnet session and type e.g.:
Now start up REMARK (double click on its icon). The first thing you will see is the "main" screen, which has two important panels which look like this:
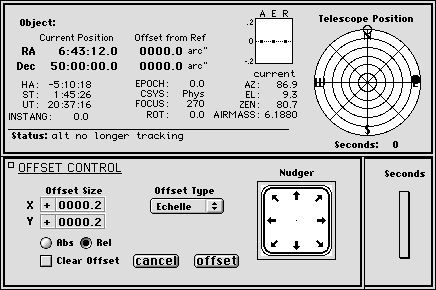
These panels show you the status of the telescope and allow you to control the telescope. The upper part of the window shows RA and Dec, and a nice circular diagram which shows the entire sky, with a black dot indicating the position of the telescope. When a new position is entered, a gray dot appears to indicate where in the sky the telescope will move to. This is useful for e.g. determining the airmass of the next target you are thinking of moving to.
The lower part of the window, "OFFSET CONTROL," is used for guiding. The offsets in X and Y are changed either with the mouse or keyboard. The units are in arc seconds. By using the mouse to click in appropriate quadrant of the Nudger, the telescope will offset in instrument coordinates by the amount set in the X and Y thumbwheels. Note that if you use the Nudger the signs are ignored because the quadrant you click on selects the direction. If you hit the 'offset' button, then the telescope will offset using the signs. Be sure to have the 'Rel(ative)' button selected so that each time you offset, the telescope will move relative to the current position. Great for guiding.
Go to the pull down menu called "Instruments," and select "Echelle." The following window will open at the top right of your screen:
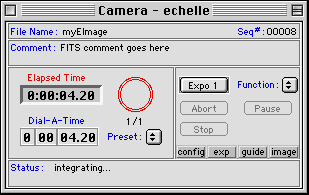
Call this the Camera-Echelle Window. It is used to:
You probably want to choose a root name under "Save Image As..." which indicates the the date of your observing run, e.g. "ech20299" for Feb. 2 in a Feb. 1999 run. The root name stays the same until you change it, and the sequence number automatically increments, giving you a unique name for each exposure. Most people save their data in FITS format, since the latest version of IRAF/SDAS (see "Data Reduction," below) works directly with fits files and eliminates the need to separately keep track of header and pixel files.
The current echelle system automatically identify
flats or comparison exposures with keywords in the image header.
One warning: the RA and Dec stored with
your data is what you type into the above window, not necessarily exactly
where the telescope points. (It is not read from encoders, for instance).
If you do some offsetting and/or searching, the position recorded with
your data can be slightly off from the actual pointing. The "OK"
button closes the window. [This is not exactly true.
We should check this with the current behavior of the telescope. The header
should record an offset value from the reference position as well as the
real RA/DEC of the current telescope position.]
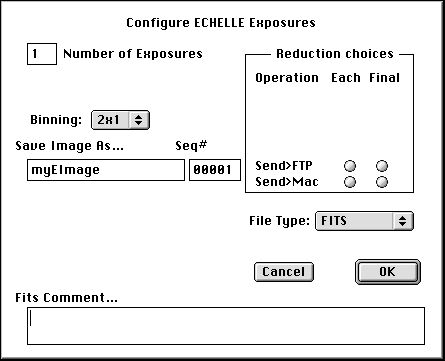
Click the button "config" in the Camera-Echelle Window and the following will appear:
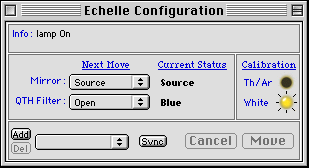
Call this the Echelle-Configuration Window. It is used to:
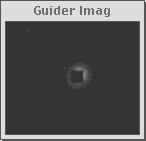
The Guide Camera Window is used to: